Posted on 9 Comments

Bead Heaven!

bead heaven

Bead Heaven is my husband’s nickname for my bead studio. Once upon a time, the space was used as my home office when I worked from home full time. When I changed jobs and started working in an office, my space was transformed from an office to a den/ family room, but I kept a desk for me to use for crafts and one for my husband to use for building model airplanes. As by bead hobby developed, my beads began to take over the room little by little. Bead storage drawers were added, shelves for decorative items became shelves for beading books, patterns and jewelry displays. The room began to get overcrowded. We rearranged the furniture a few times but it was still quite crowded.

When Covid-19 hit New York, I was forced to use this space as a home office again. My architectural work requires a large desk and large computer monitor to use for large format drawings, so it was challenging to try to fit the work from home space into this room and still maintain room for my beadwork and Zoom classes. We managed by putting up a 6′ folding table in front of the large shelving unit you see in the photo above. It was a very awkward and crowded work environment for those three months.

Then came the flood….one morning in September, we woke up to find that our hot water heater had leaked and my bead studio was covered in about 2″ of water! Yes, those are my sneakers floating under the coffee table.

Thankfully, all of my beadwork was saved and we were covered by insurance to replace the carpeting, wood furniture and other damaged items. It took weeks to dry out the space, replace the water heater and plan the new space. I still needed to teach my classes and have my beadwork accessible, so we relocated my bead studio to my dining room until the new room was ready.

I began thinking about my ever changing needs and how to best layout the new room to allow me to work from home, have lots of bead storage, and still have a nice comfy place to watch TV while beading. I created some drawings of what my dream space might look like and then I went shopping to find an affordable way to achieve it.

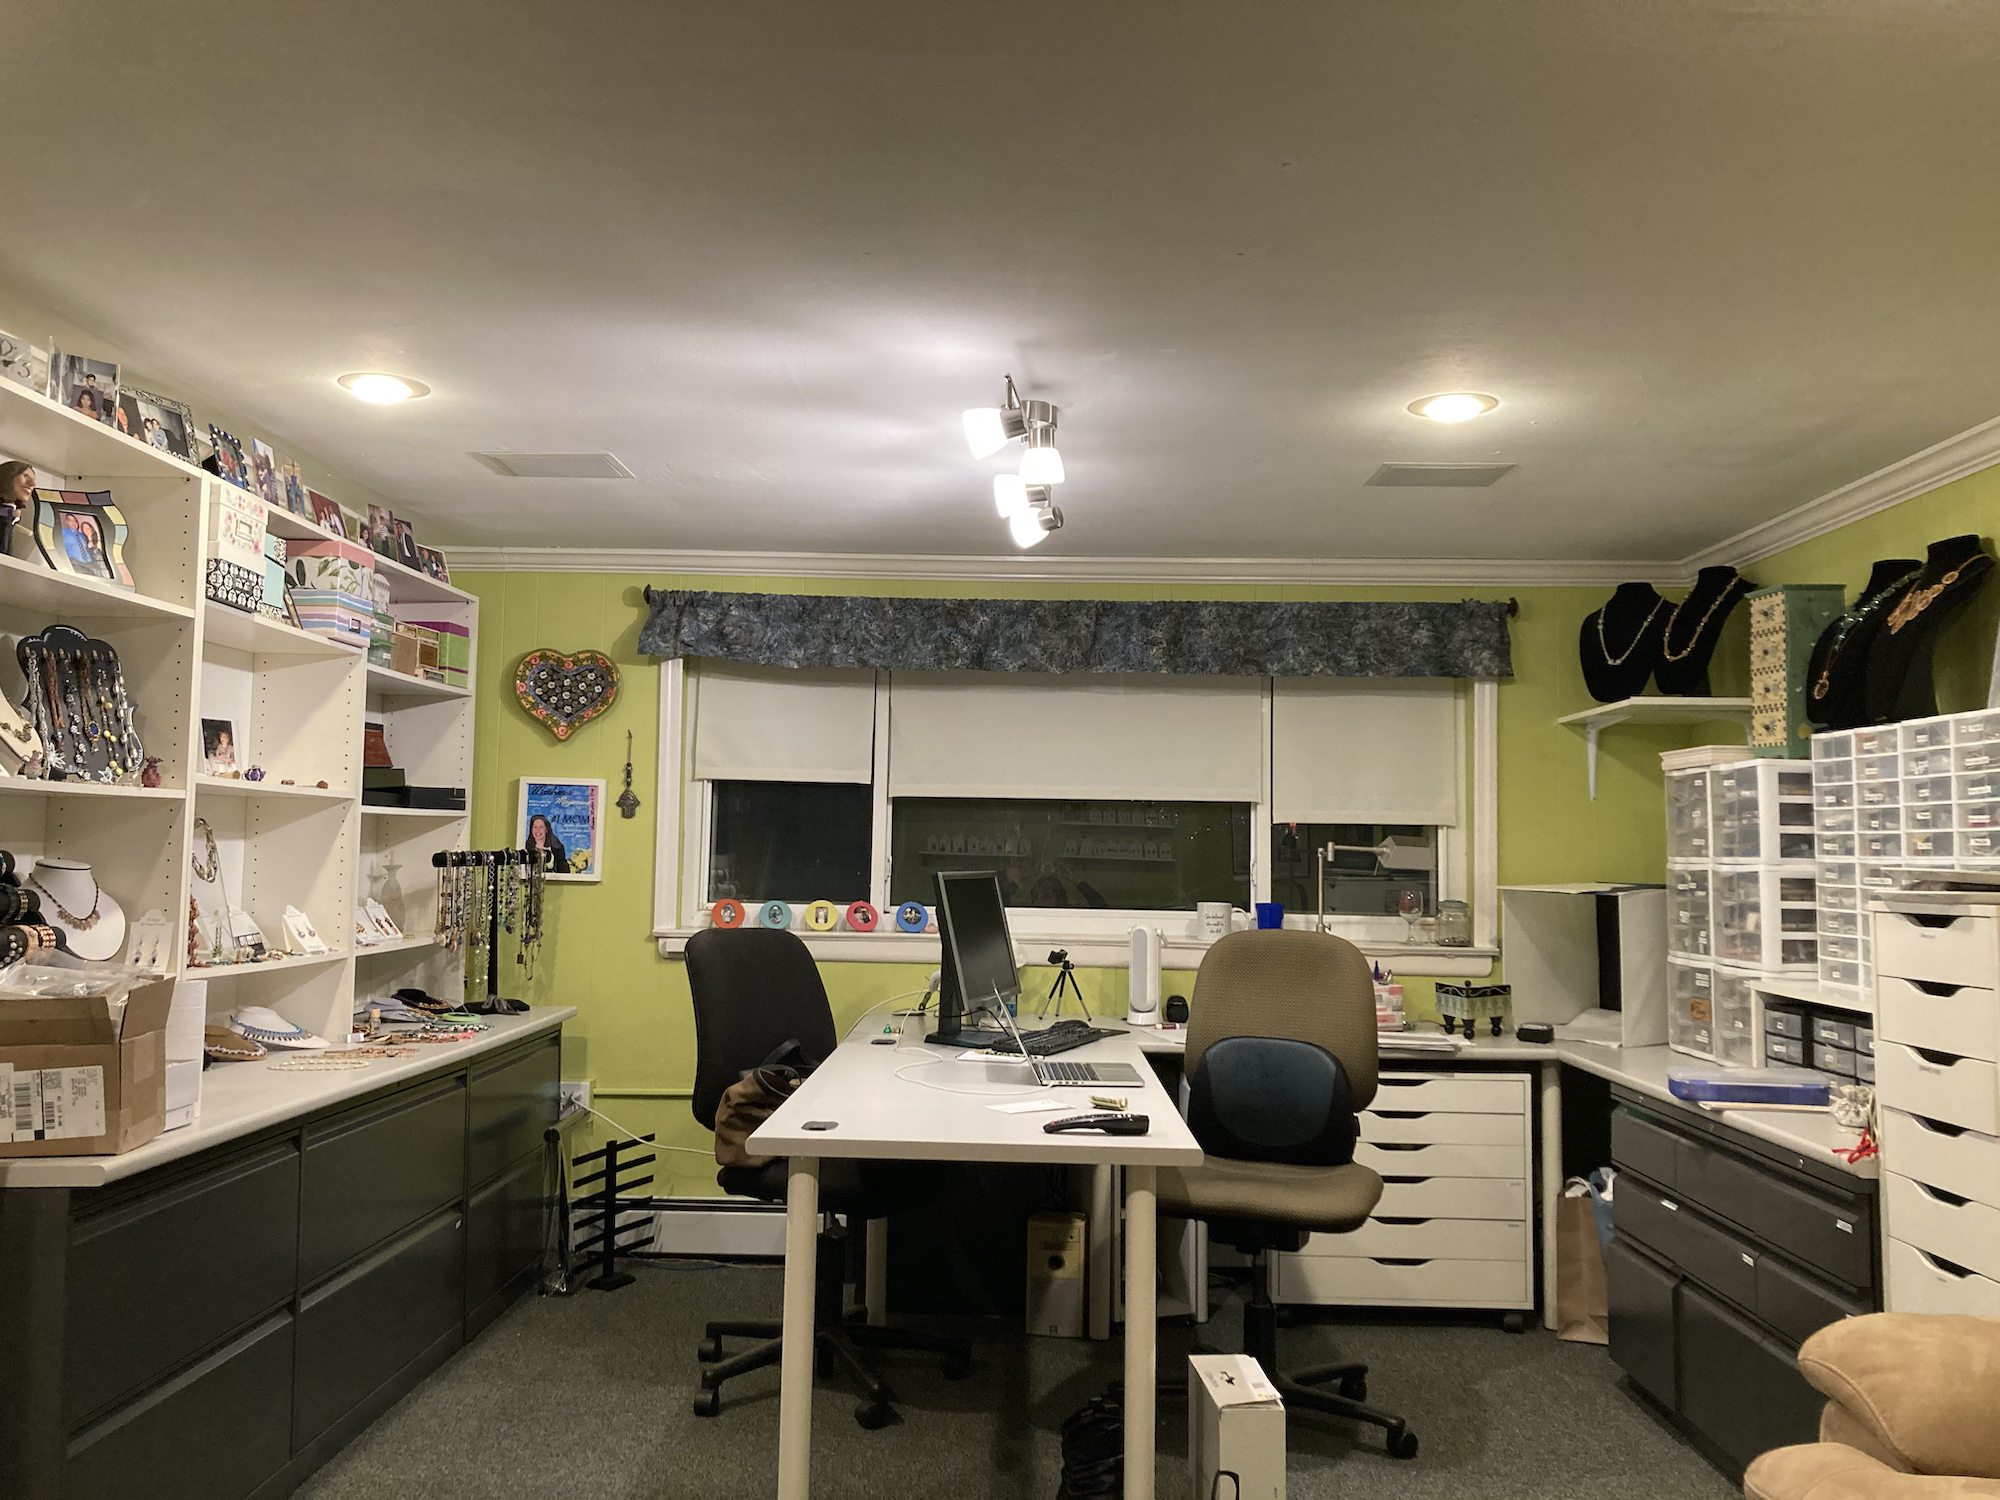
I really love the clear Sterlite bead storage drawers that I’ve been using, so maintaining a place where I could keep them readily accessible to me was important. My drawers are labelled by bead type and size, and depending upon how many I have of a certain type, I separate them out by colors as well. I use the smaller drawers for smaller quantities and types of beads and findings, and the larger drawers for those that need more space. I typically store the beads in their original containers and labels – some are in tubes, some in little zip lock bags, and others are kept on strands until I am ready to use them.

When shopping for storage, I came across the Alex cabinets by Ikea. They have very shallow drawers that are perfect for craft supplies! I purchased two of them – one wide, low cabinet that slides under my desk, and one tall thin unit that sits at the end of my desk area. They are filled with beady goodies such as cabachons, crystals, stones, and my collection of Miyuki delica beads. I’ll give you a peak into a few:

Not all of my supplies are small enough to fit into the small drawers, so I needed some larger size drawers to store things like jewelry boxes, spools of cords and chain, beading boards, kit supplies, unfinished projects, and anything else that needed to be hidden away. I found an office that was moving and selling all of their “like new” steel file cabinets and desktops so I purchased a few cubicles worth of them and was able to create a perfect U shaped desk area with a credenza type set up across from it. The steel drawers are sturdy enough to hold my heavier items such as clasps, wire, and pliers.

We added some track lighting that can be aimed down toward my desk and also aimed at my shelving of jewelry displays. My husband is very handy and built me a little custom cabinet on wheels to keep the desktop computer below the desk. He also deserves credit for hauling and assembling all of the furniture, painting the room, adding moldings, shelving, etc. There are still some finishing touches to do but he is now working on fixing up his model airplane area in a different room (yes, we had to make some sacrifices)!

There is still room for our sofa, loveseat, coffee table and TV so this room can still function as a den. My husband can hang out with me and watch TV while I sit at the desk and bead. I have plenty of space to work my day job from home when needed. I am so happy that all is now organized and I really do have my “Bead Heaven” room!

Posted on 2 Comments

Zoom Beading Classes!

Zoom Class

I’m so happy to announce that I now have online Beading classes available for purchase on my website!

I’ve been working with my local bead store, Crystal Garden Designs of NY, to provide kits for the classes. We started out offering the classes to local store customers only, but beading friends from across the country began asking to sign up as well. Melissa from Crystal Gardens has been mailing out the kits each week to anyone, anywhere who wants to join in! This weekend, we even had a beader from the UK join us! Of course, some beaders may prefer to use their own supplies, and that’s ok with me as well. Crystal Gardens can also fill in any supplies you might not have in your stash. Just give Melissa a call at (631) 750-6430 or email at beadsamillionny@gmail.com and tell her what you need. She is happy to customize kits to color preferences.

Here are the classes currently on offer for the next few weeks. If you’re interested, please sign up quickly as they are filling up fast. I’ve limited the class size to 15 students to allow proper attention to each student. The class listing will show how many spots are left in each class.

When you purchase a class, you will be able to download two pdf files: One is a document with all of the Zoom information and the other is the pattern. Make sure you sign up early enough to allow you adequate time to order the suppies or kit.

If there are any of my designs that you would like to request for a future class, please leave a comment here or send me an email.

Posted on 3 Comments

Happy New Year! Ring in 2020 with a new Shooting Star Tutorial!

Kite and Cali Shooting Star Necklace

I don’t usually make New Year’s resolutions, but this year I am making one that I think I can keep: I plan to release a new tutorial every month of the year 2020! That sounds like a lot of work, yes, but I have a bit of a head start. During my reign as a Beadwork Magazine Designer of the Year for 2019, I created 6 designs that I was not allowed to release in my own shop. Now that enough time has passed, I will be releasing them, one at a time, exactly one year after their original publication.

Why would someone want to purchase a tutorial directly from me after it’s been published in the magazine? Well, I’ve found that many of my customers do not subscribe to the magazines and/or they find the instructions in the magazines a bit difficult to follow. If you’re a regular customer of mine, you know that I break down my instructions into many steps with a large, clear diagram and/or photo directly below the written instructions for each step. I also give tips and hints within the written instructions to make it easier for the beader to have success with the pattern. Unfortunately, the magazine does not have enough space for that, so their words are kept to a minimum and their diagrams are condensed to show many steps in the same drawing. A pattern that is 4 pages in the magazine may be 8-12 pages in my tutorial. If you have not yet seen my tutorials, please sign up for my mailing list (see form on this page) and you will get a free tutorial via email so you can “try before you buy”.

I really loved working with the staff at Beadwork and was so happy that I was chosen to create these 6 new designs. Thanks so much to Tammy Honaman, Meredith Steele and Katie Hacker for this incredible opportunity! I feel I’ve improved a lot as a designer by pushing myself to create better and more exciting designs. My tutorial writing skills have also improved dramatically as a result of this experience. I hope that you will see that in the tutorials that I present this coming year.

The first tutorial is available now! My Kite and Cali Shooting Star tutorial can be purchased here.

If you’ve already made any of my designs from either purchased tutorials or from the magazine, please post pics here or on social media and tag me so I can see them! I really love seeing your work, especially when you vary the design or the colors!

Posted on Leave a comment

The long awaited: Half Tila Arches Necklace Design is now available!

Half Tila Arches 3 colors

Soon after Half Tila beads became available, I designed this necklace (the original, as shown in bronze). I posted photos of it on Facebook and it received lots of praise and requests for a pattern, but there were a few problems.

When I wore the necklace, it didn’t sit quite right. The components twisted and turned. The focal pearl bezel tilted upwards instead of lying flat on my neck. I knew how to fix it but the beads that I envisioned that would work were just not available at the time. This was just before the market became saturated with every type of two holed bead imaginable. Back then, there were only Tila Beads, SuperDuos, and the new Half Tila Beads.

A few years later, I found the cool silver colored Etched Drum beads from Kelly Stevenson of Back2Bead (as shown in the gunmetal colorway below). I knew that these beads would work well because they have a flat back and two holes. The two holes help keep the components from twisting, and the flat back helps the focal lie flat when wearing it! I remade the necklace using these beads and was quite pleased with it, so I started to write the tutorial.

Unfortunately, my pattern writing skills were not up to the task at the time. Each time I made a component, I made it differently and I had trouble finding a thread path that would be easy to diagram and to teach. I put it aside and focused on other projects.

Now, years later, Melissa Speicher from my local bead store saw the necklace and asked me to teach it at her store Crystal Garden Designs of NY. I agreed, knowing that I now had the skills to write the pattern, but I still faced a problem. The Etched Drums did not come in many colors, and some of Melissa’s customers prefer a glitzier look to the industrial look of the gun metal colorway. I searched my stash and some bead vendors and found that the pattern would work well using Preciosa Candy Beads as the connectors and a Swarovski Rivoli as the focal (peach colorway below). I remade the necklace again, and wrote up the pattern with instructions for both the gunmetal version and the peach version.

The pattern is now available in my shop. You can purchase it here: Half Tila Arches Necklace Tutorial. I hope you’ll give it a try! It’s for intermediate to advanced beaders.

Supplies for this necklace can be purchased at the following links:

Posted on 7 Comments

Zig Zag Bracelet and matching pendant

Zigzag bracelet

Kate McKinnon and the team at Contemporary Geometric Beadwork has inspired me to bead along with them as they share their techniques for creating exciting shapes made primarily with Miyuki Delica beads. Here’s the backstory behind how these pieces were created:

Starting from what CGB has dubbed a “podcast bead” made with 20 size 8/0 seed beads, I beaded along with Kate’s videos to make a “rickrack starter bangle” that has 20 zigzag points. My starter bangle is the turquoise zig zag bangle set around the tiny podcast bead that it grew from shown in the adjoining photo.

I then chose some fall colors – gold, two shades of raspberry and two shades of green, with the intention of using all of these for my bangle. As I began to bead the raspberry and gold zigzag, I reached a point where I felt I was very unhappy with the colors and I didn’t think the piece was worth finishing. I didn’t think that adding the greens I had selected would help it. So I put the beadwork aside for a few days and worked on another design.

One of the great things about beading with a community of creative friends is that they can help you see past your beading design blocks. My friend Ilene always tells me to keep working through the “ugly” and it will get better. I have a deeply ingrained need to not let anything go to waste – especially long hours of beadwork made with expensive beads. So when my friend Shari came over to knit one day while I beaded, I asked her advice about the zigzag bracelet. She said that she loved the raspberry and gold but agreed I should lose the green. We then played around with various ideas to improve the piece. These are some experiments we looked at:

The design in the center was exciting to me. I decided that a mirrored zigzag would work well, especially if I added some more rows of gold in the center. I also loved that the mirrored zigzag formed a shape that was a perfect fit for GemDuo beads! I had recently seen some gorgeous 24k gold plated GemDuo bead substitutes that would fit perfectly in the little windows in my zigzag!

I was now faced with a new dilemma- if I added the gold GemDuos in the windows, the bangle would tighten and would no longer fit me. In order to get a wearable bracelet with the gold inserts, I would need to cut the bangle. This would scare many people as they know that the beadwork could easily come apart, but I had cut a peyote bangle once before so I felt brave.

Before cutting, I carefully wove in the beadwork on each side of my cut line. The surgery went very smoothly and I now had a flat bracelet! I found a perfect clasp for the bracelet- the 29mm Beadslide Cross Hatch clasp by Elegant Elements slid right onto my end row of Delicas. But now the bracelet was too big for me. The added width of the clasp combined with the fact that this didn’t need to slip over my wrist anymore, created the need for one more cut. I reinforced and cut one zigzag section off of my bracelet and the fit was perfect.

Now, you know, I couldn’t let that one extra section of cut off zigzag go to waste. I left it on my beading table for a few days and pondered about making it into a pendant. I could have left it as is and just added a chain, but I really felt it wanted more dimension and wanted to be diamond – shaped. I figured out how to continue the rows of peyote that had been cut, added a bail and a simple 2 bead twisted herringbone rope, and I had a necklace to match my bracelet!

I hope you enjoy reading about my design process and inspiration!

If you’d like to try making your own zigzag bracelet, check out The Contemporary Geometric Beadwork Blog and YouTube channel.

If you’d like to purchase the supplies to make this, contact your local bead store or check out these links:

Posted on 5 Comments

Beady UFOs (Un-Finished Objects)

Beady UFO shadow box

The bead community is notorious for collecting Un-Finished Objects. For many, it’s a kit that they’ve purchased but could not complete because they’ve gotten bored with it. Or maybe they came up to a portion of the instructions that wasn’t clear and they got stuck. Sometimes the project was just not coming out as expected. Or sometimes, a new project was just so exciting that all work in progress needed to wait while the new project took over.

For me, most of my UFOs happen when I’m designing. Often, the first color selections I choose will not work as expected so I will redo the work with new colors. Or I may start a piece of beadwork but then find that it’s not working out well or I get bored with it. I may have tried someone else’s pattern in order to learn a new technique but did not have time or inclination to complete it. Sometimes I make more components than I need for a particular piece.. And sometimes I just experiment and play with the beads to see what would happen if I try this or that but then I don’t know what to do with the work.

As I can’t bear to rip out all my hours of work, I often save bits of beadwork in a drawer, hoping that one day I will find a good use for them. Here’s what my drawer full of UFOs looked like. Looking at this drawer left me quite uninspired to create any kind of work of art.

Beady UFO progress

But then my friend and bead artist, Ilene Yair, came over to my house and picked out some color coordinated pieces and arranged them on my couch like this. I was instantly inspired and realized that I CAN make lemonade out of my lemons!

Before beginning, I went to my local craft store to purchase a shadow box frame with a precut 5″ x 7″ opening in the mat. I cut a piece of black bead backing to be about 5 1/2 x 7 1/2″. I sewed the selected beadwork UFOs onto the bead backing one at a time, starting near the center, composing the exact arrangement as I worked. If I got stuck, I took a peak at the photo I took of Ilene’s composition on my couch to remind me that this is possible! I finally came to a composition that I was happy with and put the precut mat over the embellished bead backing. As I did so, I saw that I accidentally sewed some of the beadwork over the confines of the mat’s framed area. The beadwork spilled out a bit over the edges of the mat. I decided that this was a happy accident, as I liked it even better than if I would have stayed within the lines.

I’m so happy that now my pretty components have a place where they can be displayed, instead of hiding in a drawer! I hope that some of my other mistakes that are still in the drawer will find a happy home as well.

Posted on Leave a comment

Free Pattern Available!

free beading pattern

If you’ve never tried one of my patterns and would like a free pattern to see the quality of my work, you can sign up for my mailing list and I will send you a free exclusive pattern that is not available in my store!

I’ve heard some beaders say that they are afraid to purchase a pattern because they do not know what the quality of the pattern will be and they are worried that they will not be able to understand the instructions. I completely get that! I would like to offer you this pattern so that you can “try before you buy”.

The pattern is for an understated but funky chain made with bugle beads, seed beads and pearls. It can be worn on its own or used as a chain for a coordinating pendant. It can be made monochromatic, like my sample, or with contrasting colors. You can vary the design by using different size bugle beads and pearls. I’d love to see what you come up with!

The pattern was designed as a funky variation to my most popular pattern, Etherial. You can find the pattern for Etherial here: https://sosassybysusansassoon.com/product/etherial-netted-pearl-with-bugles-necklace-tutorial/

Etherial Netted Pearl
Posted on 7 Comments

2019 Beadwork Designer of the Year!

I’m so excited to have been chosen by Beadwork Magazine to be one of three Designers of the Year for 2019! It is a great honor, and one that I did not expect to achieve. I share this with fellow honorees Wendy Ellsworth and Vezsuzsi. I hope you’ll enjoy what we create this year along with Beadwork’s many other talented contributors.

As a Designer of the Year, I will be sharing the instructions to make one of my designs in each of this year’s six issues. The first (Feb/Mar) has already hit the press, and is available for purchase in print form or digital form at publisher Interweave’s website. In it, I present my Thistle Necklace. The design was inspired by the beautiful two-holed Kite beads and three-holed Cali beads that were sent to me by Beadsmith last year. As I played around with the beads, I found that they form very easy to make bezels that can be used to encase Swarovski rivoli crystals of all sizes.

Here’s what the components looked like on my bead mat as I worked on the design. Notice that some of them are open – without a rivoli inside them. Those were the first ones I made. Once I saw how pretty they looked open, I knew they would only be improved by adding some bling. Luckily, I had just the right color rivolis to add!

After making these components, I saw that Beadsmith came out with some new kite beads that had a laser-etched design on them. I fell in love with them and had to design something special with these. I used the same basic bezeled rivoli idea and made this necklace, bracelet and pendant.

The tutorials for the necklace and bracelet are available here: Kite and Cali Necklace Kite and Cali Bracelet

Kite and Cali Poinsetta bracelet tutorial

The design also works well for Christmas as the design looks a lot like a Poinsettia when beaded with red kite beads. The tutorial for the bracelet includes the supplies needed to make it in either the laser-etched beads or the poinsettia beads.

As I just couldn’t get enough of these fun components, I played around with some variations of the open-holed components that I had originally created (I hate letting good beadwork go to waste). Here’s what I created with the open components.

I hope you enjoyed this bit of insight into my design process and I hope I’ve inspired you to create some lovely beadwork! Please share your thoughts and your beadwork in the comments.

Posted on 26 Comments

Welcome to So Sassy By Susan Sassoon’s New Blog!

Susan Sassoon at a Bead show

I’m so excited to introduce you to my new website. Up until now, I’ve been maintaining a strong presence on Facebook and selling my tutorials on Etsy. I decided to take the plunge and create my own website and mailing list so I can better communicate with and serve my customers and hopefully reach some new ones.

Creating a website was a lot more challenging than I thought it would be. Way back in the early 1990s I had learned HTML and created a few basic websites, but the computer world moves quickly and I pretty much had to relearn website developing from scratch. I am quite proud of what I created here so far and I am looking forward to improving the site and adding more content. Please take a look around and let me know your thoughts. Don’t be shy about letting me know how it can be improved or if I’ve made any typos, mistakes or if any links have expired. You can comment below or send me a private message here.

If you’ve already beaded a project from one of my tutorials and would like me to share your work on this site, please send me an email with a photo and I’ll be very happy to post it on my site. You can also reach me here with any questions you may have on any of my tutorials.

If you haven’t yet signed up for my mailing list, please do so – I will be sending you a free exclusive tutorial to thank you for joining me. I promise I won’t fill up your mail box with lots of emails. I plan to send out blog posts when I have a new tutorial or some beady news or tips to share.

Happy Beading,

Susan